Set Up Power BI Service Credentials
Step-by-step guide to configure Azure AD, Power BI permissions, and connect Soterre PBI Analyzer to your tenant.
Overview
Soterre PBI Analyzer uses a Service Principal (service account) to access the Power BI REST API. This is a secure way to automate access without using personal credentials.
What You'll Need
- Administrator access to Azure Portal (portal.azure.com)
- Administrator access to Power BI Admin Portal (app.powerbi.com/admin-portal)
- Permissions to create applications in Azure AD
- Fabric / Power BI Premium capacity (for the Capacity module)
Who Can Do Each Step
Steps 1–5 are admin-only. If you are not an administrator, see What if you don't have admin rights? — you can send this page to your admin and continue from Step 6 once they're done.
| Step | What | Who can do it |
|---|---|---|
| 1–3 | Azure app registration, API permissions, client secret | Azure admin (Application Administrator / Global Administrator) |
| 4 | Security group | Azure admin |
| 5 | Power BI Admin Portal settings | Fabric Administrator / Power BI Administrator |
| 6 | Install Capacity Metrics app | Any user with capacity admin rights |
| 7 | Add Service Principal to workspaces | Workspace Admin (no tenant admin needed) |
| 8 | Add tenant in the analyzer | Any user — just needs the credentials from steps 1–3 |
Prerequisites
Required Roles
| Portal | Minimum Role |
|---|---|
| Azure AD | Application Administrator or Global Administrator |
| Power BI | Fabric Administrator or Power BI Administrator |
Licenses
- For basic functionality: Power BI Pro
- For Capacity module: Fabric Capacity (F SKU) or Power BI Premium (P SKU)
Step 1: Create Azure AD Application
⚠️ Admin required (Steps 1–4). These steps happen in the Azure Portal and need the Application Administrator (or Global Administrator) role. Not an admin? Forward this page to your IT administrator — everything they need is written down step by step.
1.1 Open Azure Portal
- Go to https://portal.azure.com
- Sign in with an administrator account
1.2 Navigate to Azure Active Directory
- In the search bar, type "Azure Active Directory"
- Select "Microsoft Entra ID" from the results
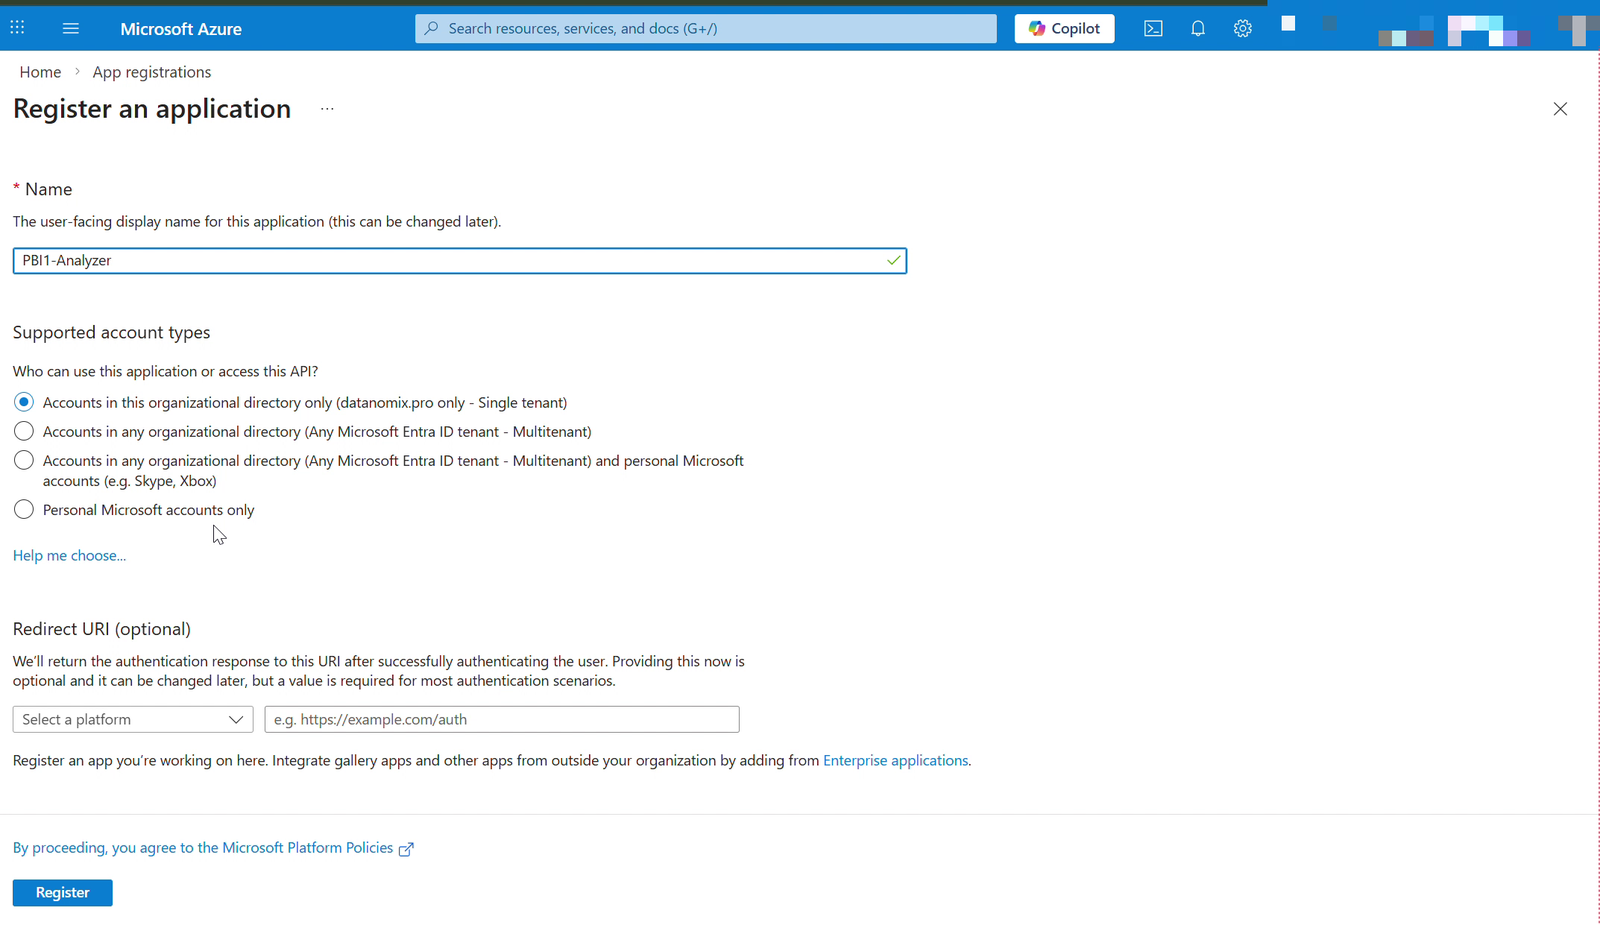
1.3 Create a New Application
- In the left menu, select "App registrations"
- Click "+ New registration"
1.4 Fill in the Registration Form
| Field | Value |
|---|---|
| Name | PBI-Analyzer (or any descriptive name) |
| Supported account types | Accounts in this organizational directory only |
| Redirect URI | Leave blank |
- Click "Register"
1.5 Save Important Identifiers
After creating the application, you'll see the Overview page. Copy and save:
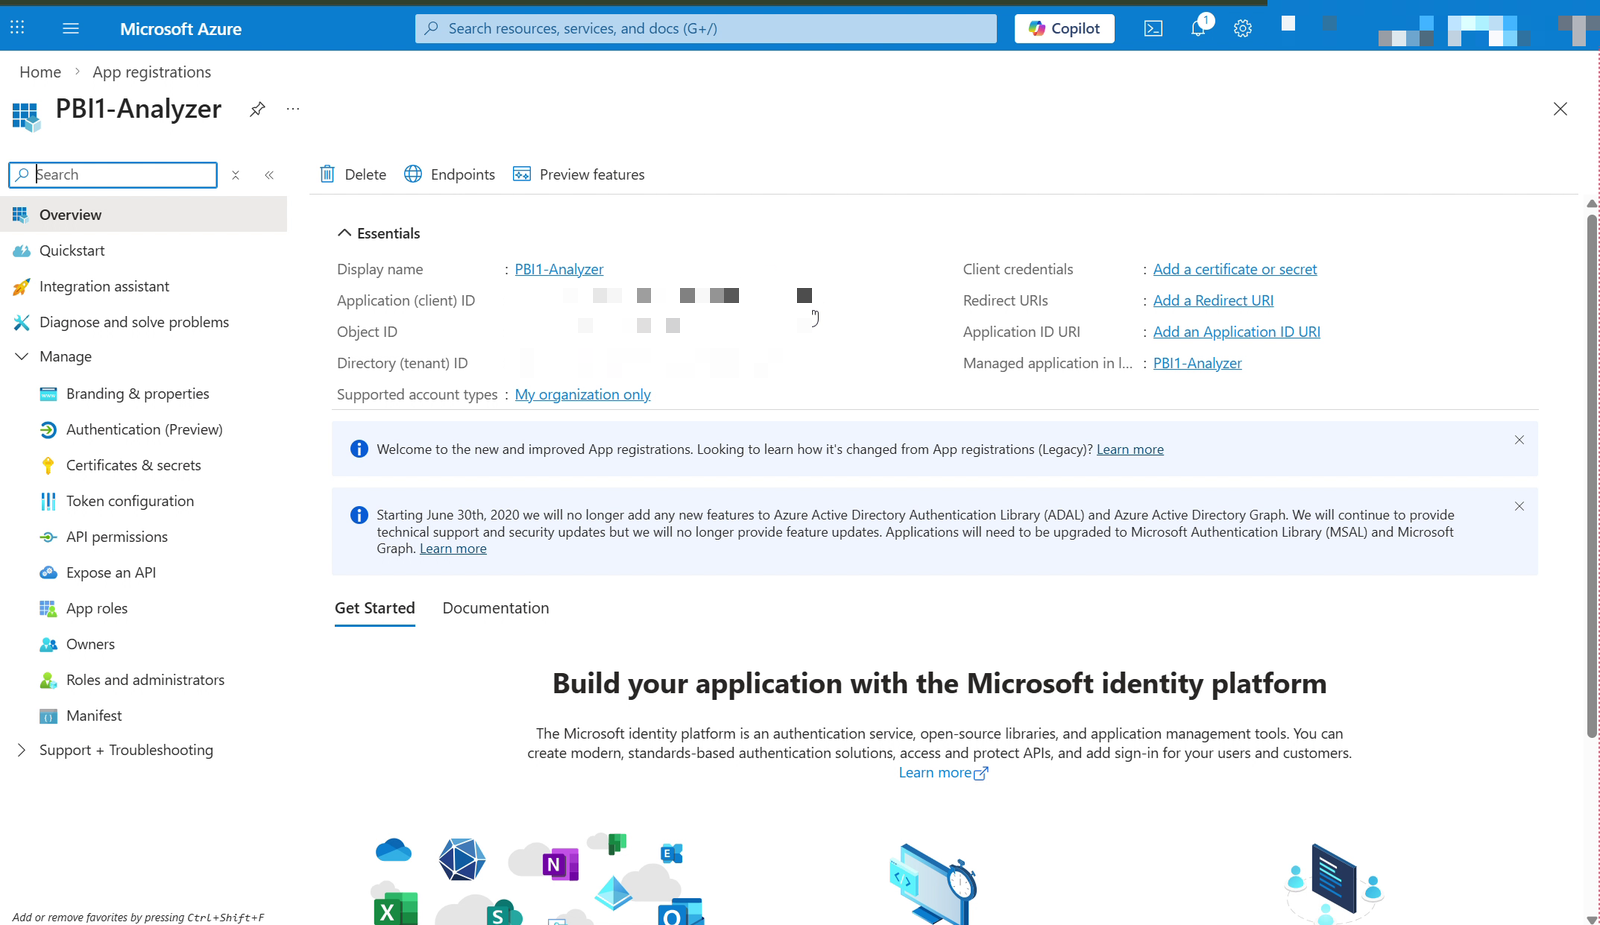
Application (client) ID: xxxxxxxx-xxxx-xxxx-xxxx-xxxxxxxxxxxx  ← This is your CLIENT_ID
Directory (tenant) ID:   xxxxxxxx-xxxx-xxxx-xxxx-xxxxxxxxxxxx  ← This is your TENANT_ID
IMPORTANT: Save these values — you'll need them later!
Step 2: Configure API Permissions
2.1 Open API Permissions Section
- In the left menu of your application, select "API permissions"
- Click "+ Add a permission"
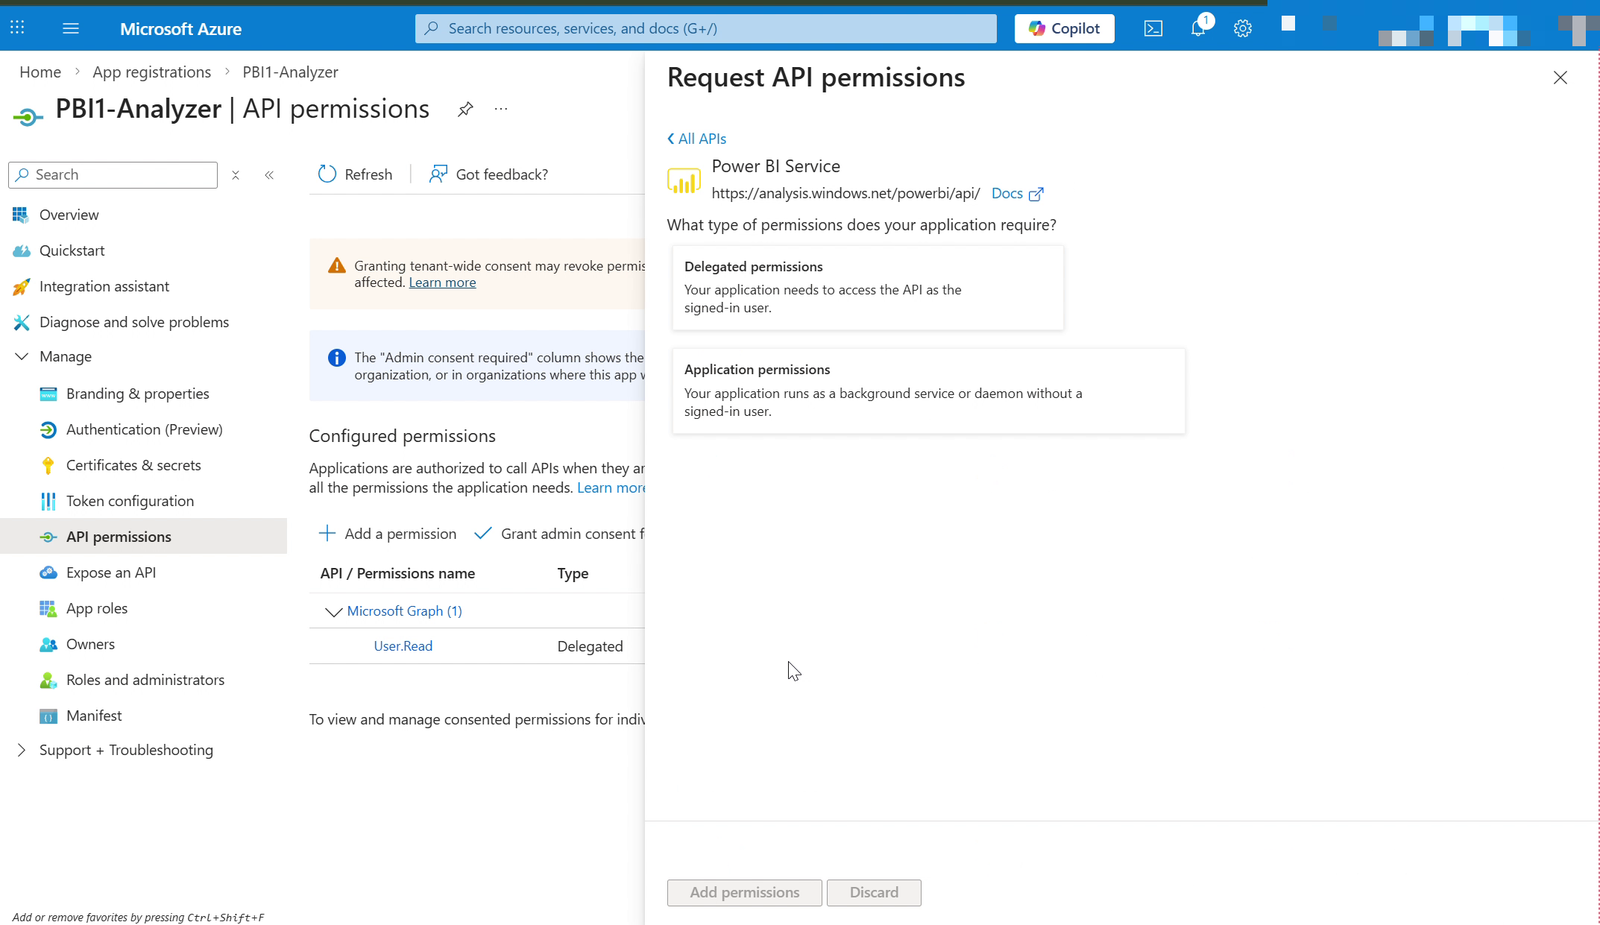
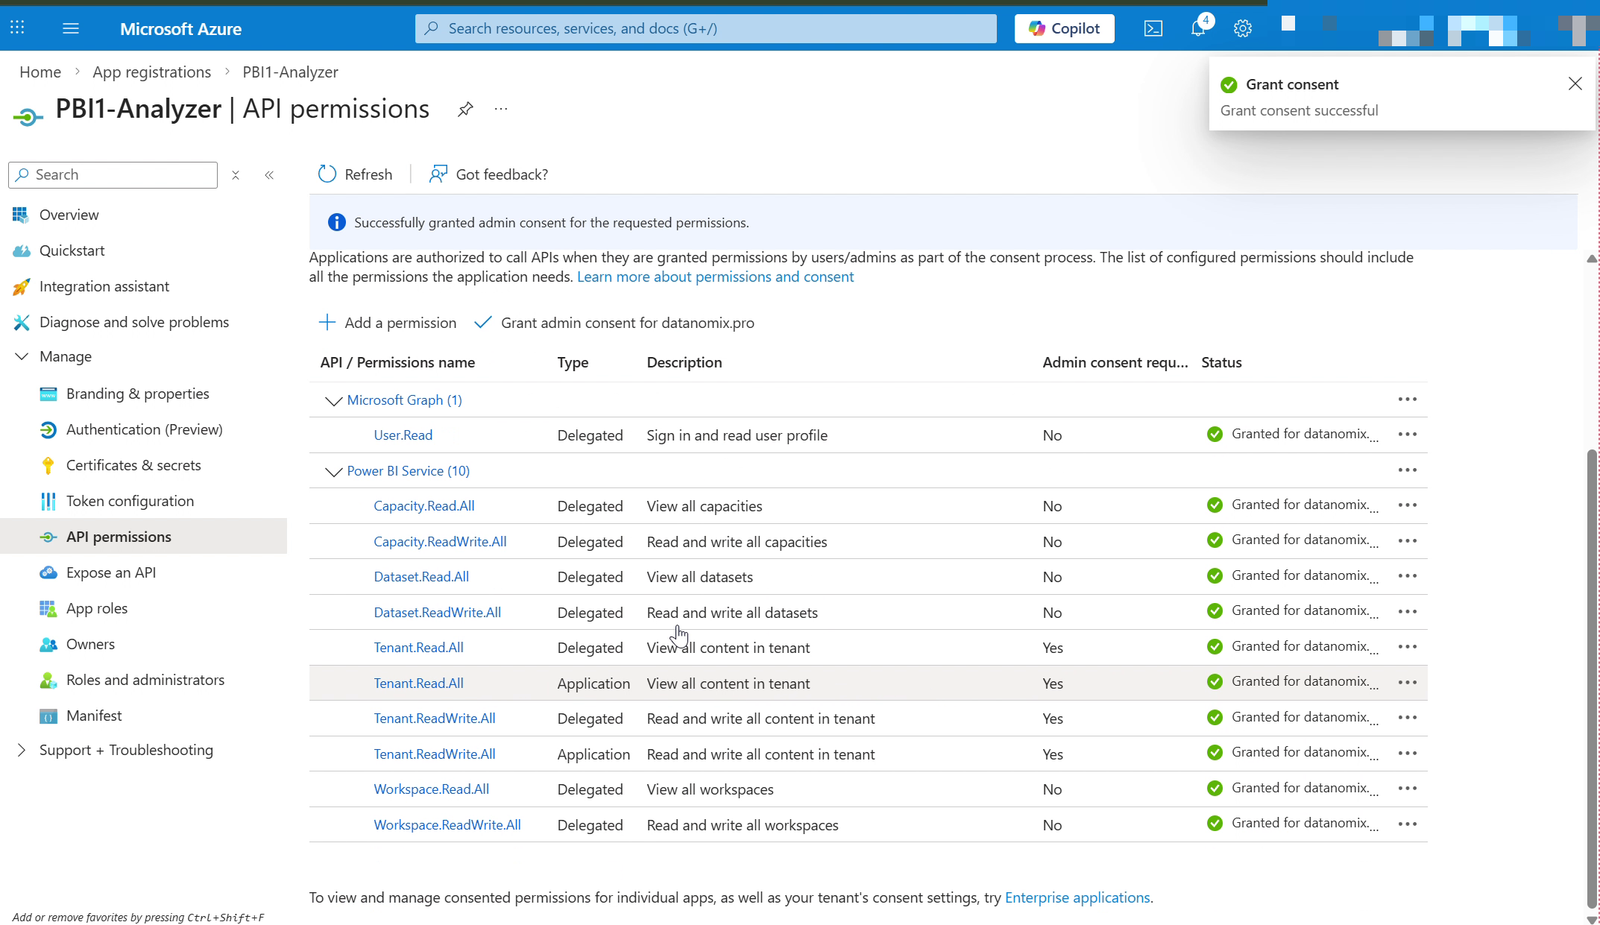
2.2 Add Power BI Service Permissions
- Select "Power BI Service"
- Select "Application permissions" (NOT Delegated!)
- Check the following permissions under Tenant:
Tenant.Read.All— View all content in tenantTenant.ReadWrite.All— Read and write all content in tenant
- Click "Add permissions"
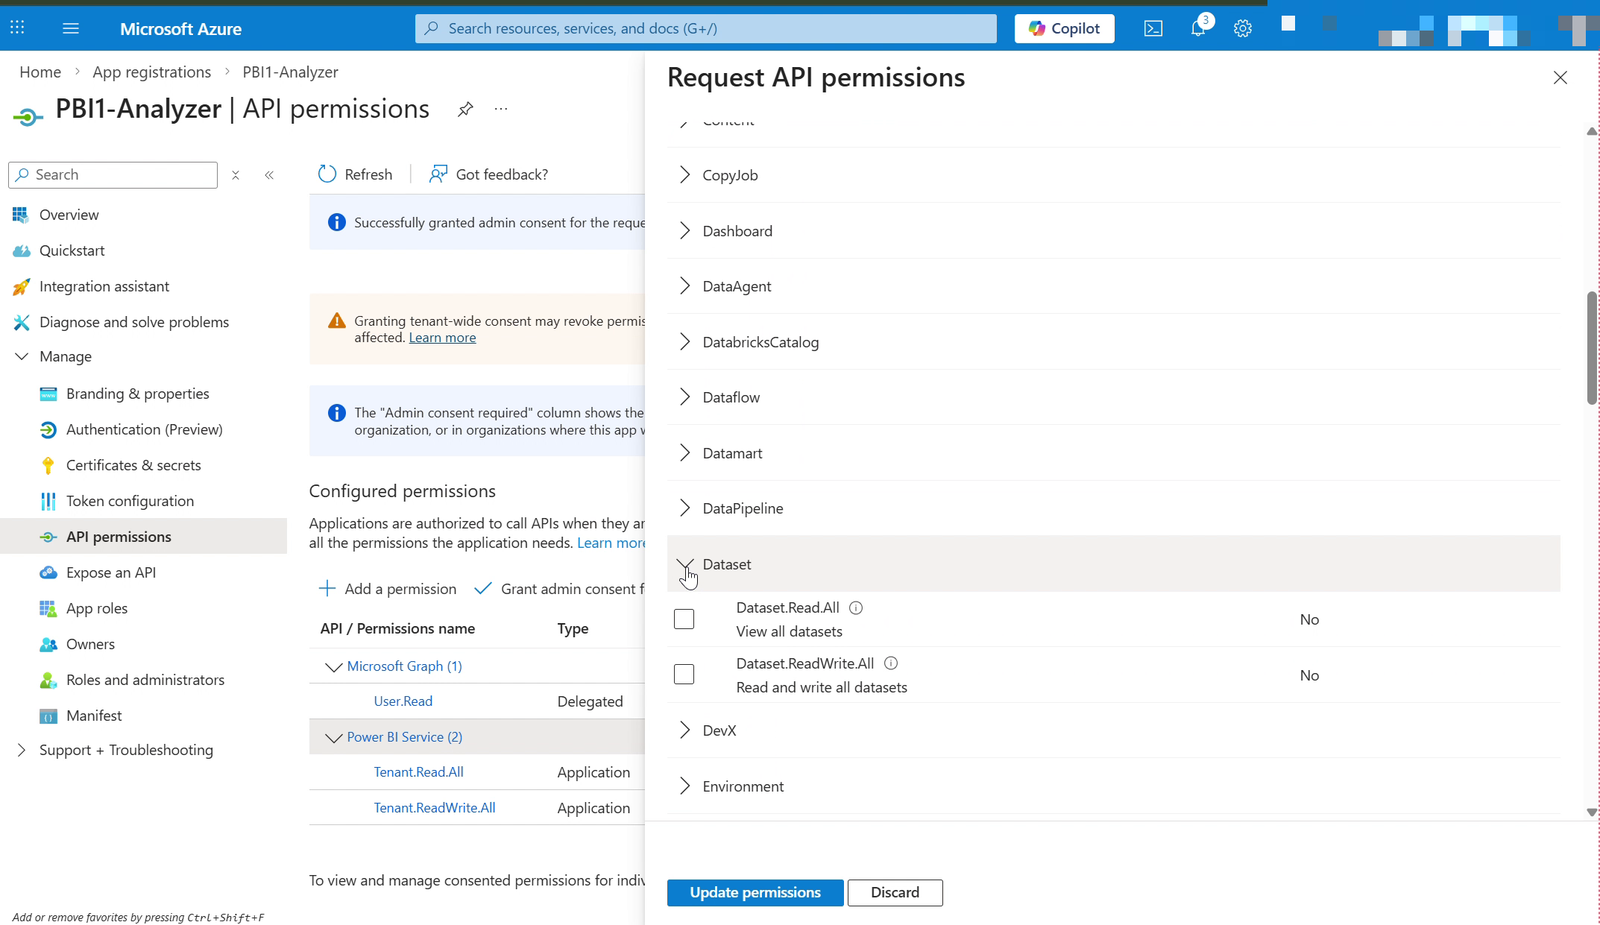
Then click Power BI Service again and add Application permissions for:
| Category | Permission | Description |
|---|---|---|
| Capacity | Capacity.Read.All | View all capacities |
| Workspace | Workspace.Read.All | View all workspaces |
| Dataset | Dataset.Read.All | View all datasets |
| Report | Report.Read.All | Read reports |
Select Read.All for every category listed above.
2.3 Grant Admin Consent
IMPORTANT: Without this step, the application won't work.
- Click the "Grant admin consent for [Your organization]" button
- Confirm by clicking "Yes"
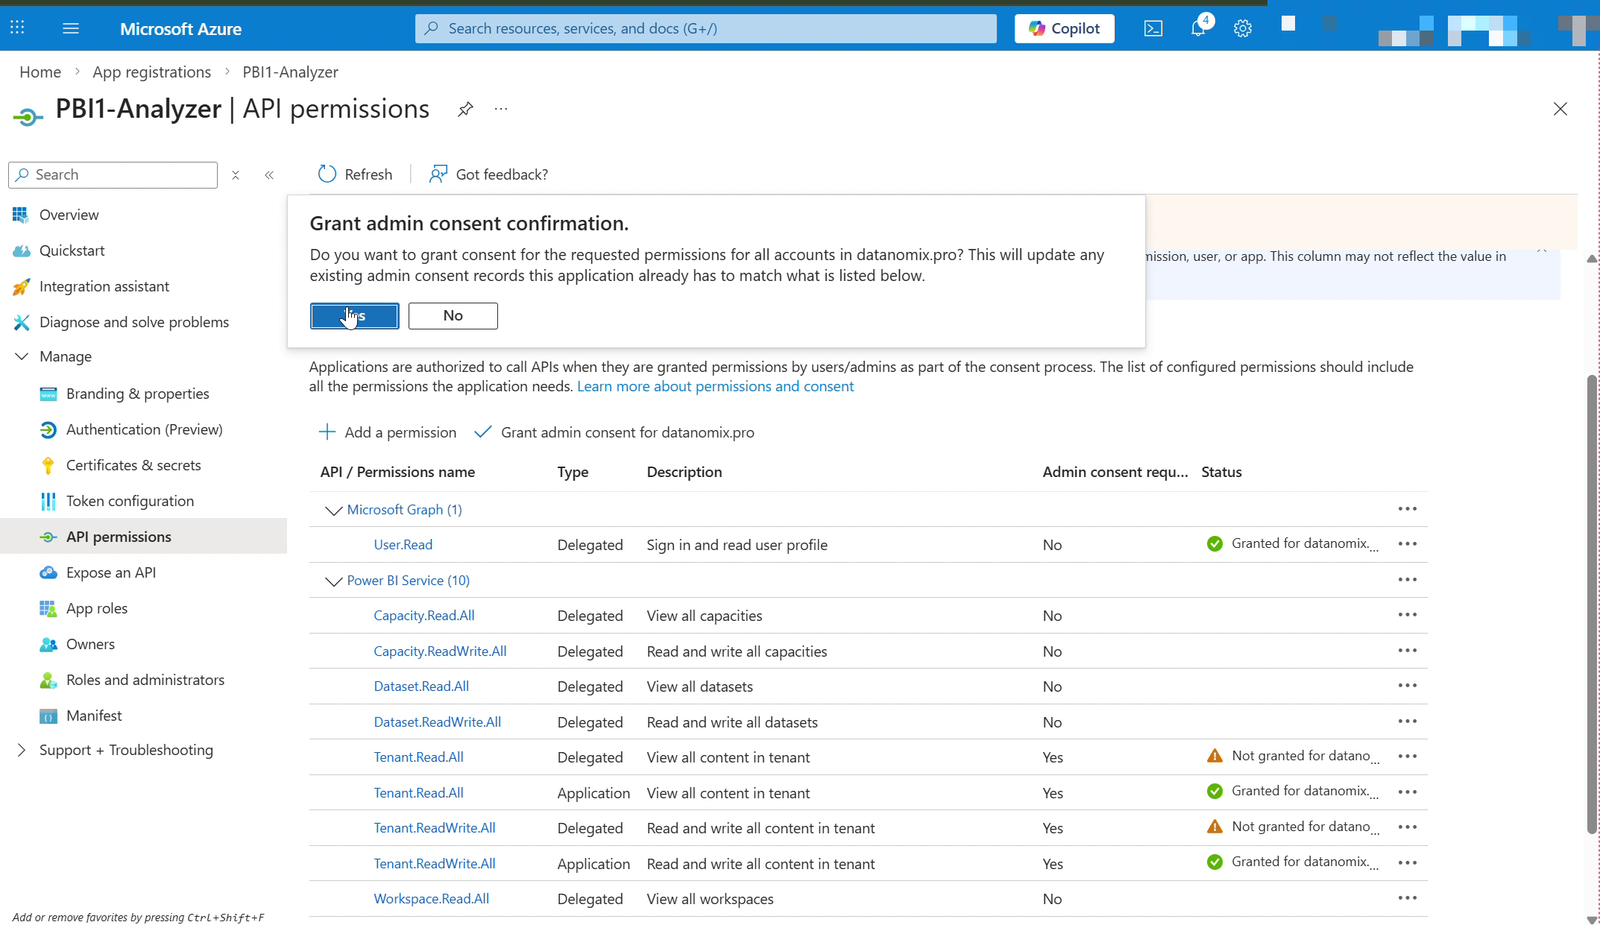
After successful consent, all permissions should show a green checkmark.
Step 3: Create Client Secret
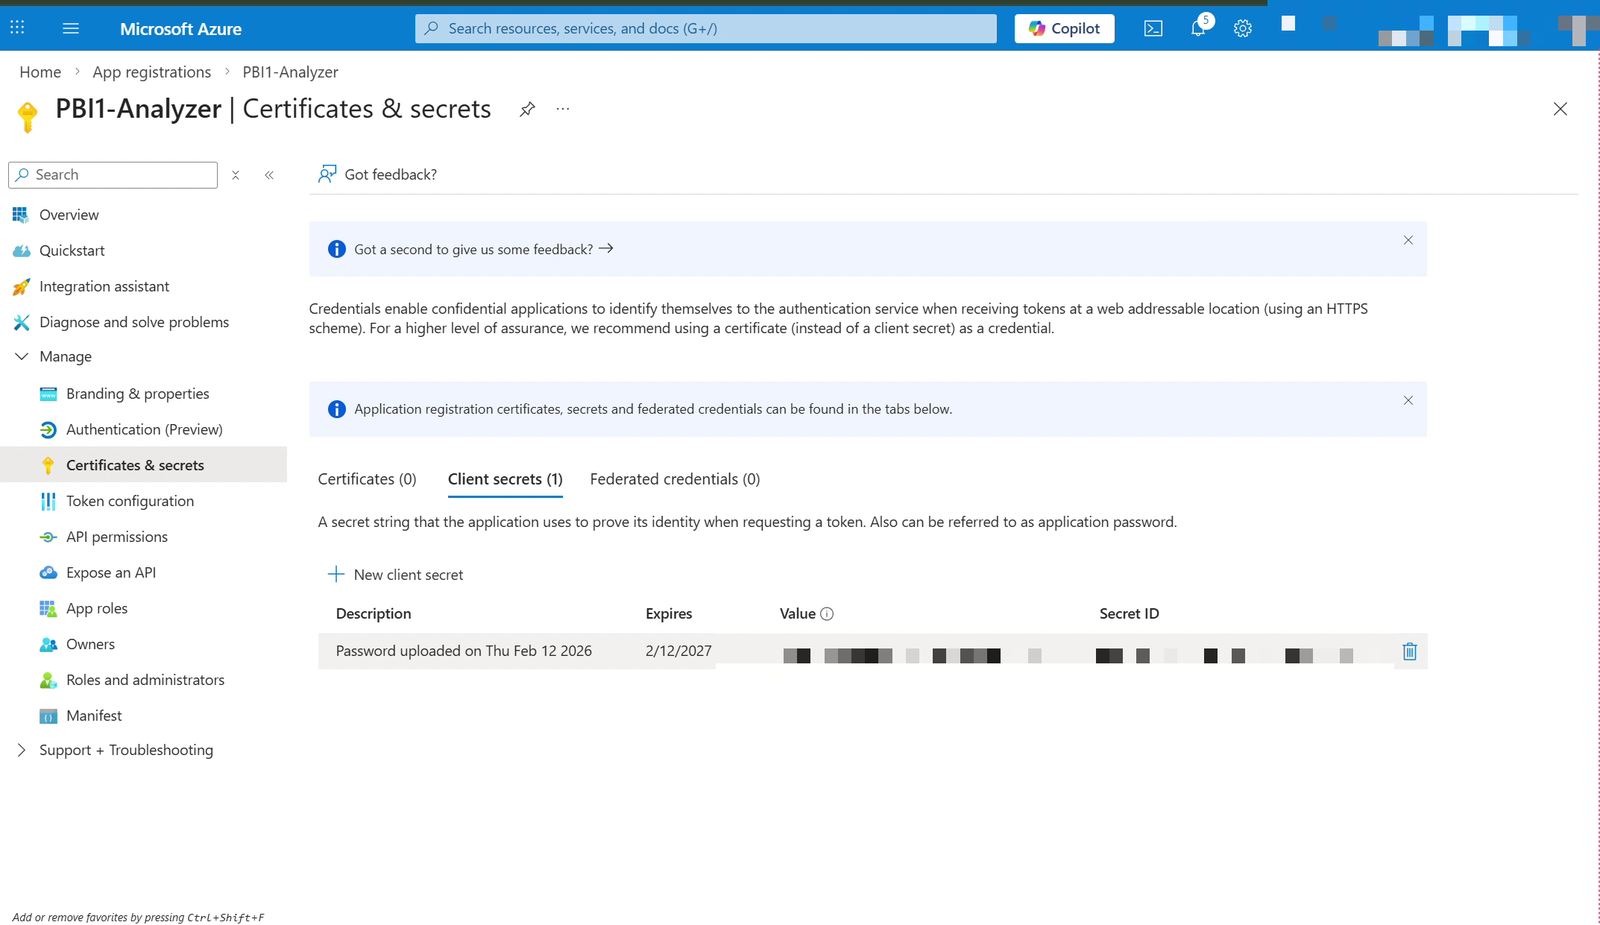
3.1 Open Certificates & Secrets Section
- In the left menu of your application, select "Certificates & secrets"
- Go to the "Client secrets" tab
- Click "+ New client secret"
3.2 Create the Secret
| Field | Recommended Value |
|---|---|
| Description | PBI-Analyzer-Secret |
| Expires | 24 months (or per your organization's policy) |
- Click "Add"
3.3 Copy the Secret Immediately
CRITICAL: After creating the secret, its value is shown ONLY ONCE. If you leave the page without copying it, you'll need to create a new secret.
Copy the value from the "Value" column (NOT "Secret ID").
Step 4: Create Security Group
A security group is needed to control which service principals can access the Power BI Admin APIs. This is a security best practice.
4.1 Create the Security Group in Azure
- Go to Azure Portal (portal.azure.com)
- Navigate to Microsoft Entra ID > Groups
- Click "+ New group"
4.2 Fill in Group Details
| Field | Value |
|---|---|
| Group type | Security |
| Group name | PBI-Analyzer (or any descriptive name) |
| Group description | Security group for Soterre PBI Analyzer service principal |
| Membership type | Assigned |
4.3 Add the Service Principal as a Member
- Under "Members", click "No members selected"
- Search for "PBI-Analyzer" (the app name you registered in Step 1)
- Select it and click "Select"
- Click "Create"
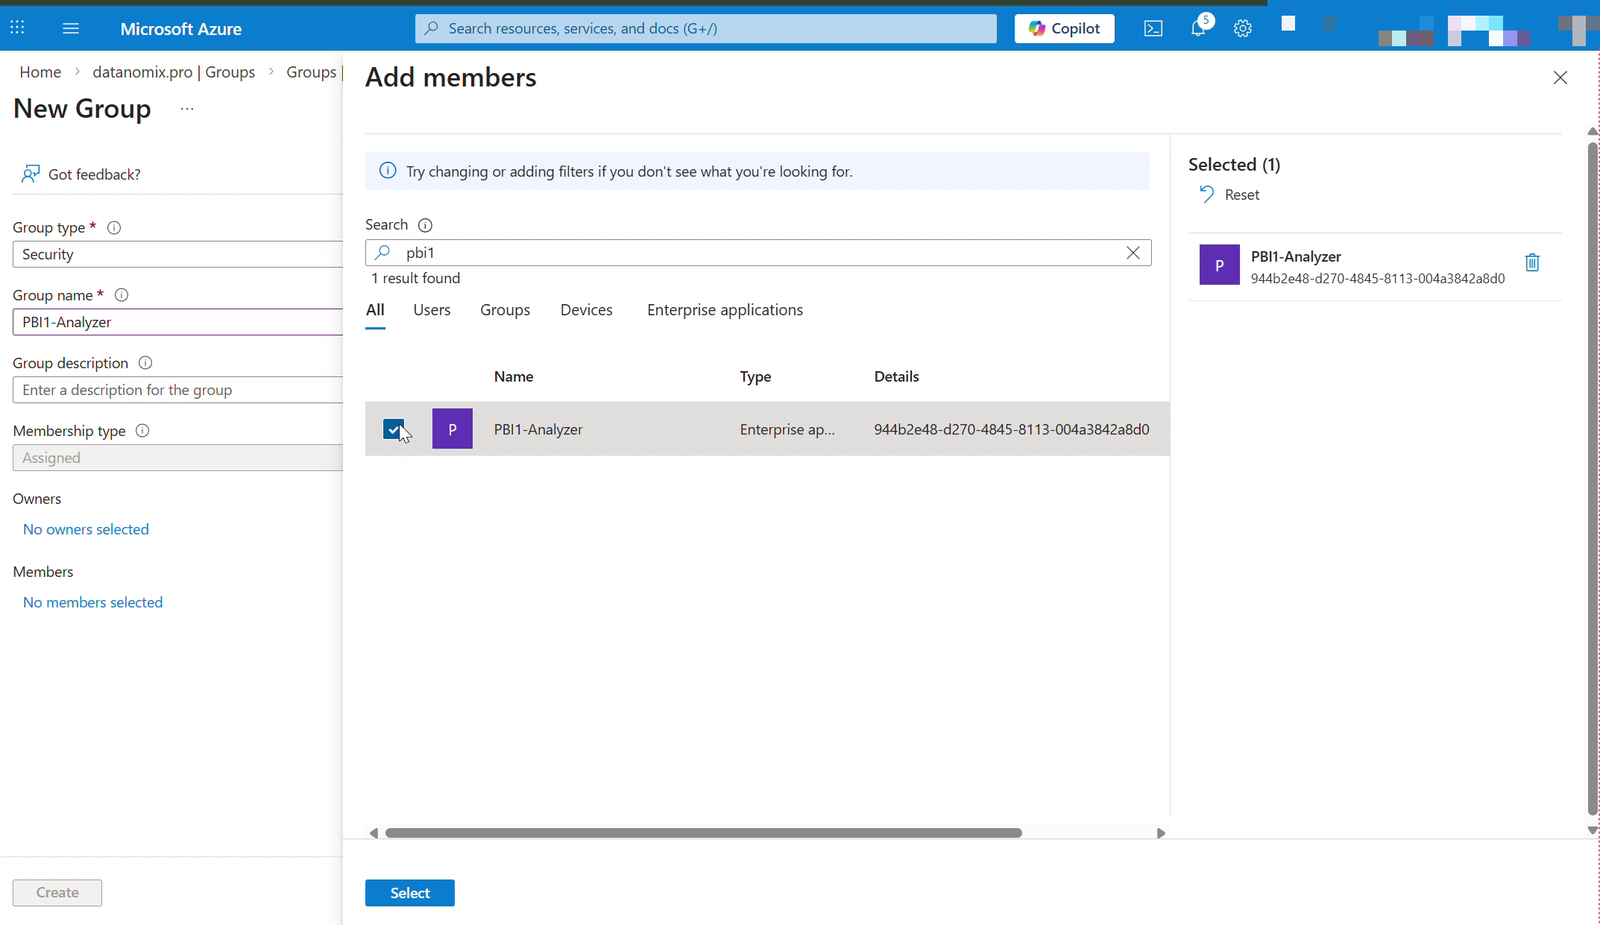
Note: If you can't find the service principal by app name, try searching by the Application (client) ID. You may also need to look under "Enterprise applications" in Entra ID first to ensure the service principal exists.
Step 5: Configure Power BI Admin Portal
⚠️ Admin required. This step needs the Fabric Administrator (or Power BI Administrator) role — the Admin Portal is simply not visible to regular users. If the Settings → Admin portal menu item is missing for you, ask your admin to do this step.
5.1 Open Power BI Admin Portal
- Go to https://app.powerbi.com
- Click the gear icon in the top right corner
- Select "Admin portal"
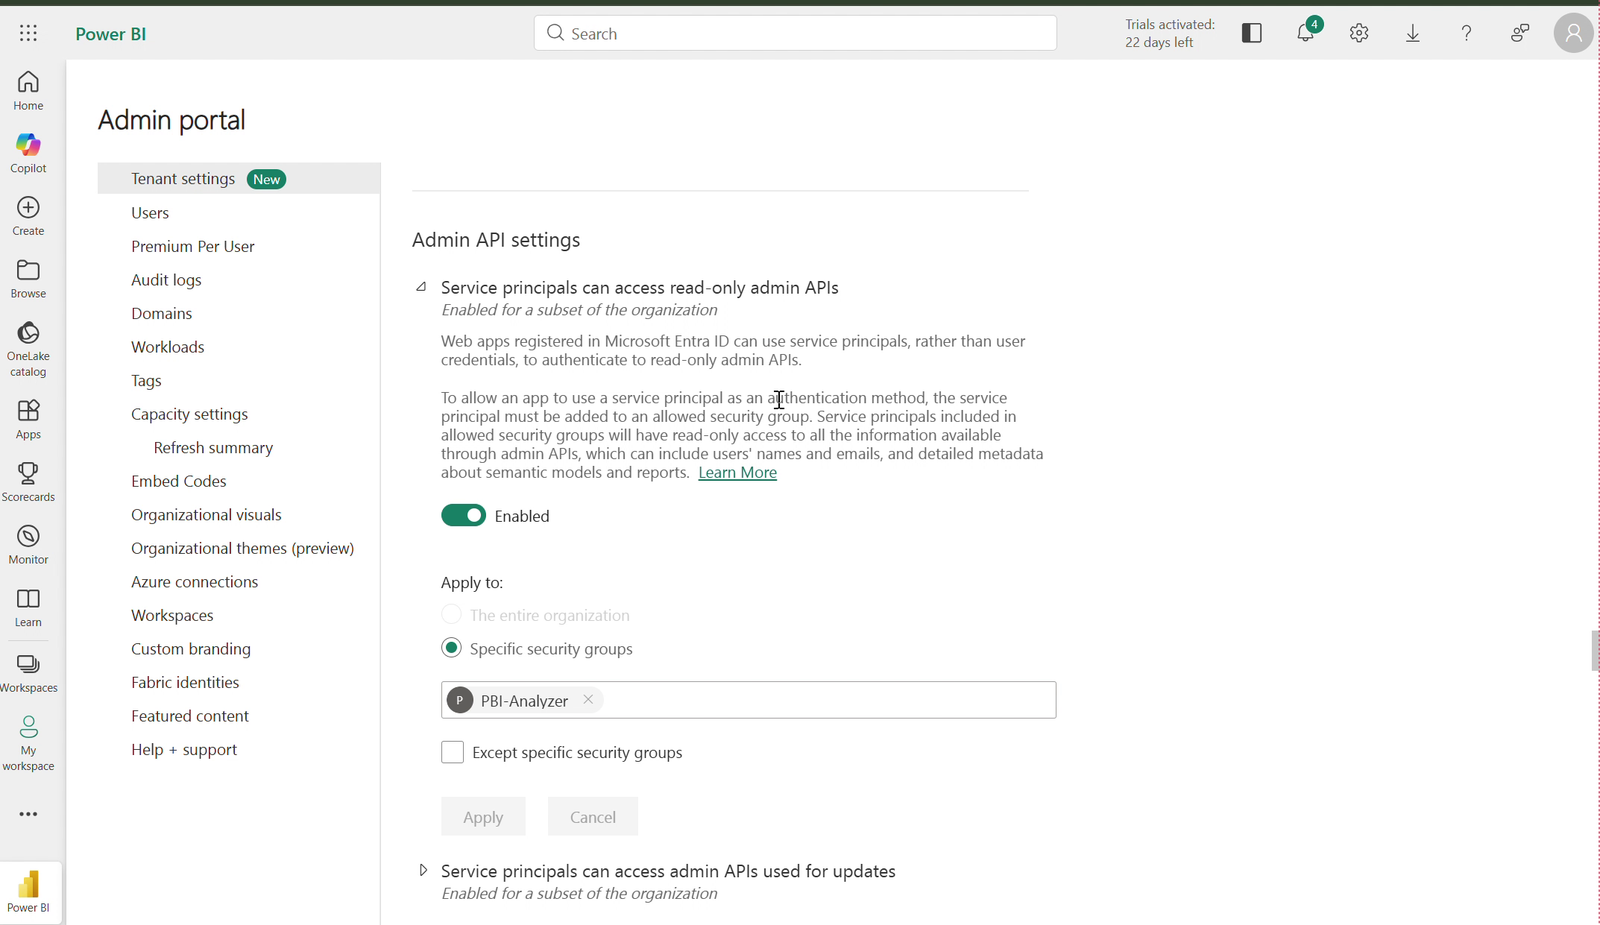
5.2 Enable Service Principal API Access
- In the left menu, select "Tenant settings"
- Scroll down to the "Admin API Settings" section
- Find "Service principals can access read-only admin APIs"
5.3 Configure the Permission
- Toggle the switch to Enable
- Under "Apply to:", select "Specific security groups"
- Add the PBI-Analyzer security group (created in Step 4)
- Click "Apply"
5.4 Also Enable These Settings (Same Process)
Repeat the same for these additional tenant settings:
| Setting | Status | Apply to |
|---|---|---|
| Service principals can access read-only admin APIs | Enabled | PBI-Analyzer security group |
| Service principals can access admin APIs used for updates | Enabled | PBI-Analyzer security group |
| Enhance admin APIs responses with detailed metadata | Enabled | Entire organization |
| Allow service principals to use Power BI APIs | Enabled | PBI-Analyzer security group |
Note: After changing tenant settings, it may take up to 15 minutes for the changes to take effect.
Step 6: Install Fabric Capacity Metrics App
This step is required for the Capacity module to show real CU (Compute Unit) consumption data.
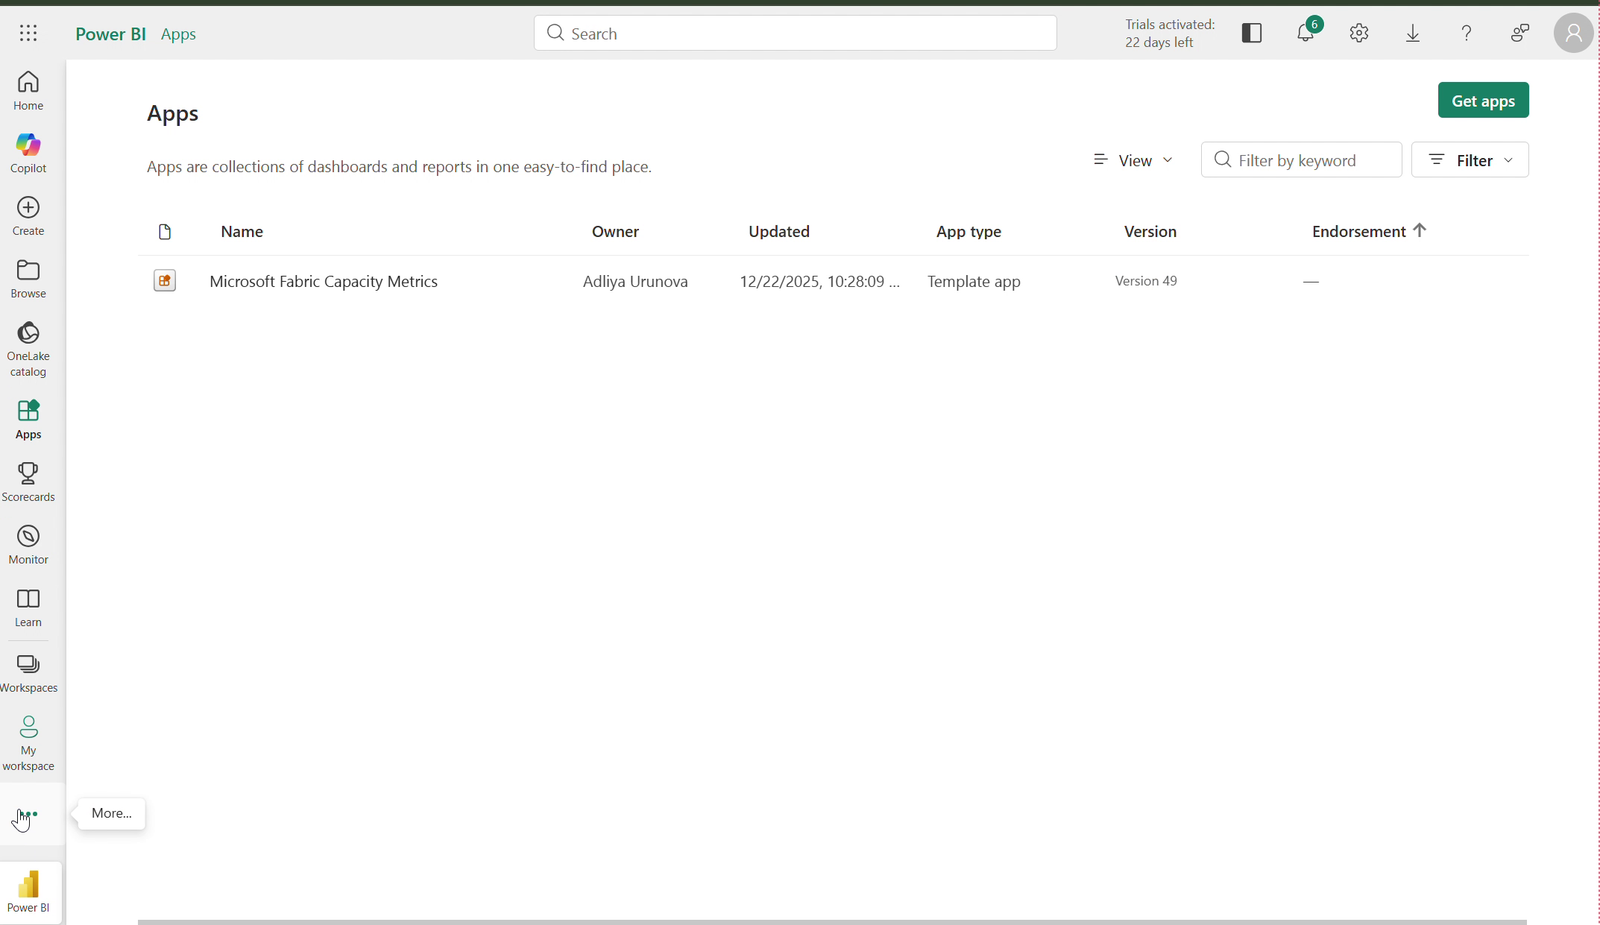
6.1 Install the Application
- Go to https://app.powerbi.com
- Navigate to Apps (left sidebar)
- Click "Get apps" (top right)
- Search for "Microsoft Fabric Capacity Metrics"
- Click "Get it now"
6.2 Connect to Your Capacity
- After installation, open the app
- It will prompt you to connect to a capacity — select your capacity from the dropdown
- Click "Connect"
- Wait for the data to refresh (this may take a few minutes)
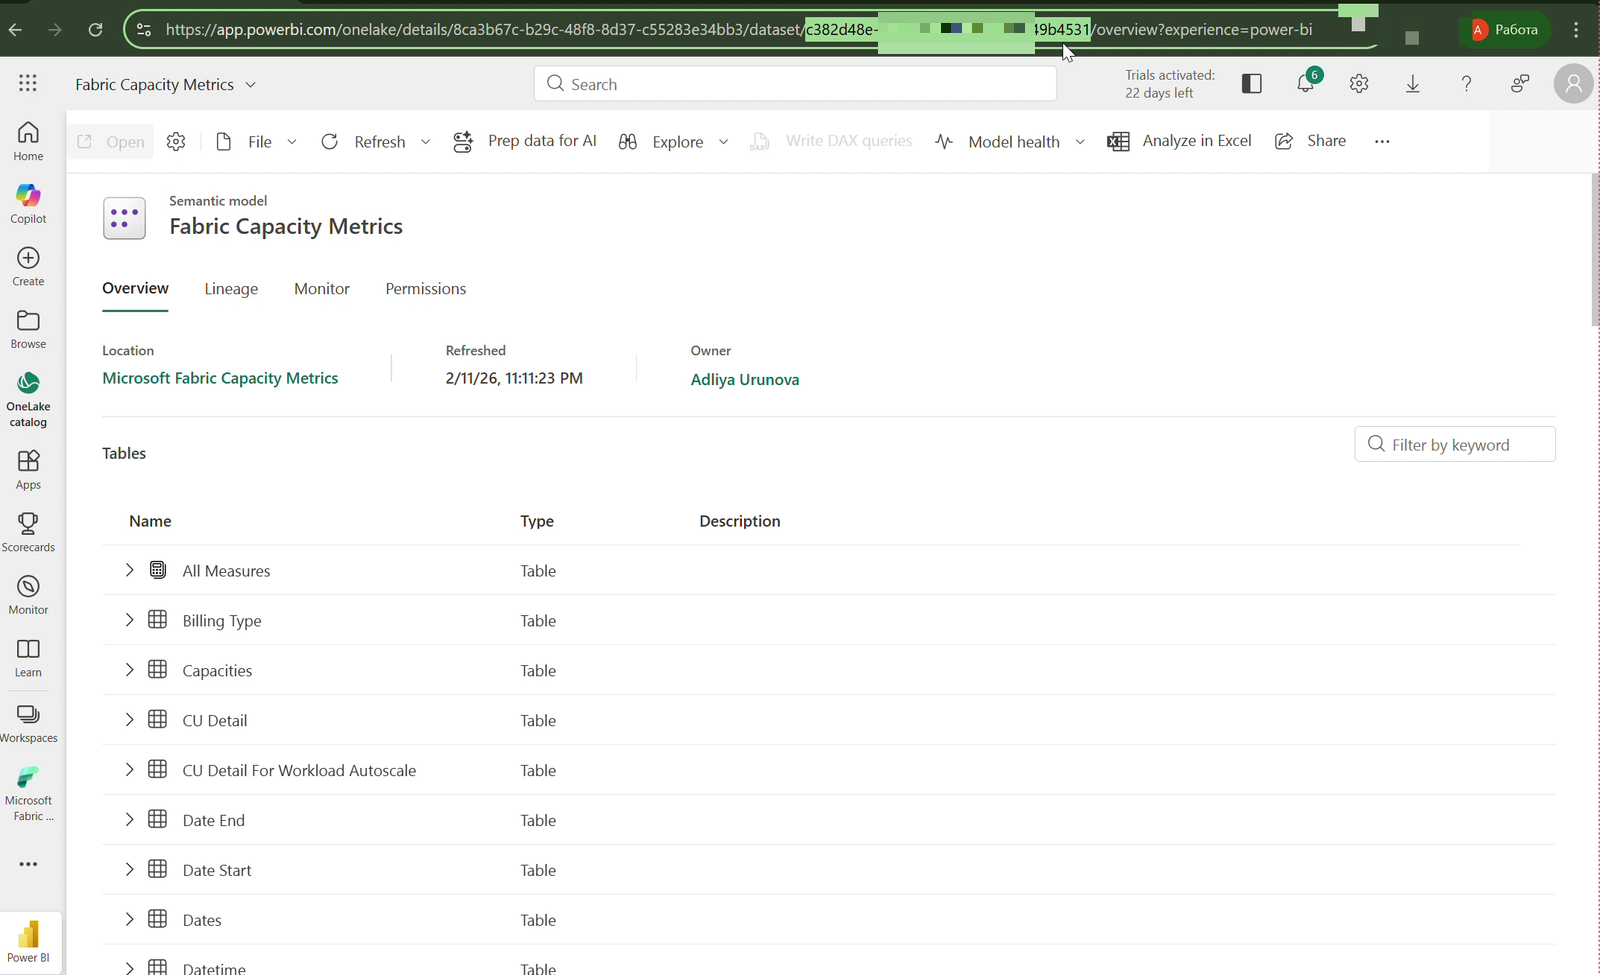
6.3 Get the Workspace ID and Dataset ID
You need these two IDs to enter in Soterre PBI Analyzer:
From the URL:
- Open the Fabric Capacity Metrics app in Power BI
- Look at the browser URL bar. It will look like:
https://app.powerbi.com/groups/XXXXXXXX-XXXX-XXXX-XXXX-XXXXXXXXXXXX/... - The GUID after
/groups/is your Metrics Workspace ID - Navigate to the workspace containing the metrics dataset
- Click on the dataset (semantic model) named "Fabric Capacity Metrics"
- The URL will show:
https://app.powerbi.com/groups/.../datasets/YYYYYYYY-YYYY-YYYY-YYYY-YYYYYYYYYYYY/... - The GUID after
/datasets/is your Metrics Dataset ID
Step 7: Add Service Principal to Workspaces
✅ No tenant admin needed. Any workspace Admin can do this step for their own workspace.
This is a critical step! The Soterre PBI Analyzer service principal needs workspace-level access to read your data.
7.1 Why Is This Needed?
Soterre PBI Analyzer uses the Power BI REST API (GET /groups) to list workspaces. This API only returns workspaces where the service principal has been explicitly added as a member. Without adding the service principal to a workspace, the analyzer cannot see it.
7.2 Which Workspaces Need Access?
| Workspace | Required? | Purpose |
|---|---|---|
| Your business workspaces | Yes — for each workspace you want to analyze | Scan reports, datasets, refresh history |
| Microsoft Fabric Capacity Metrics | Yes — required for CU chart | Run DAX queries for capacity metrics |
7.3 How to Add the Service Principal
For each workspace you want to analyze:
- Open Power BI (app.powerbi.com)
- Navigate to the workspace (e.g., "BI_Test")
- Click "Manage access" (or click "..." > "Workspace access")
- Click "+ Add people or groups"
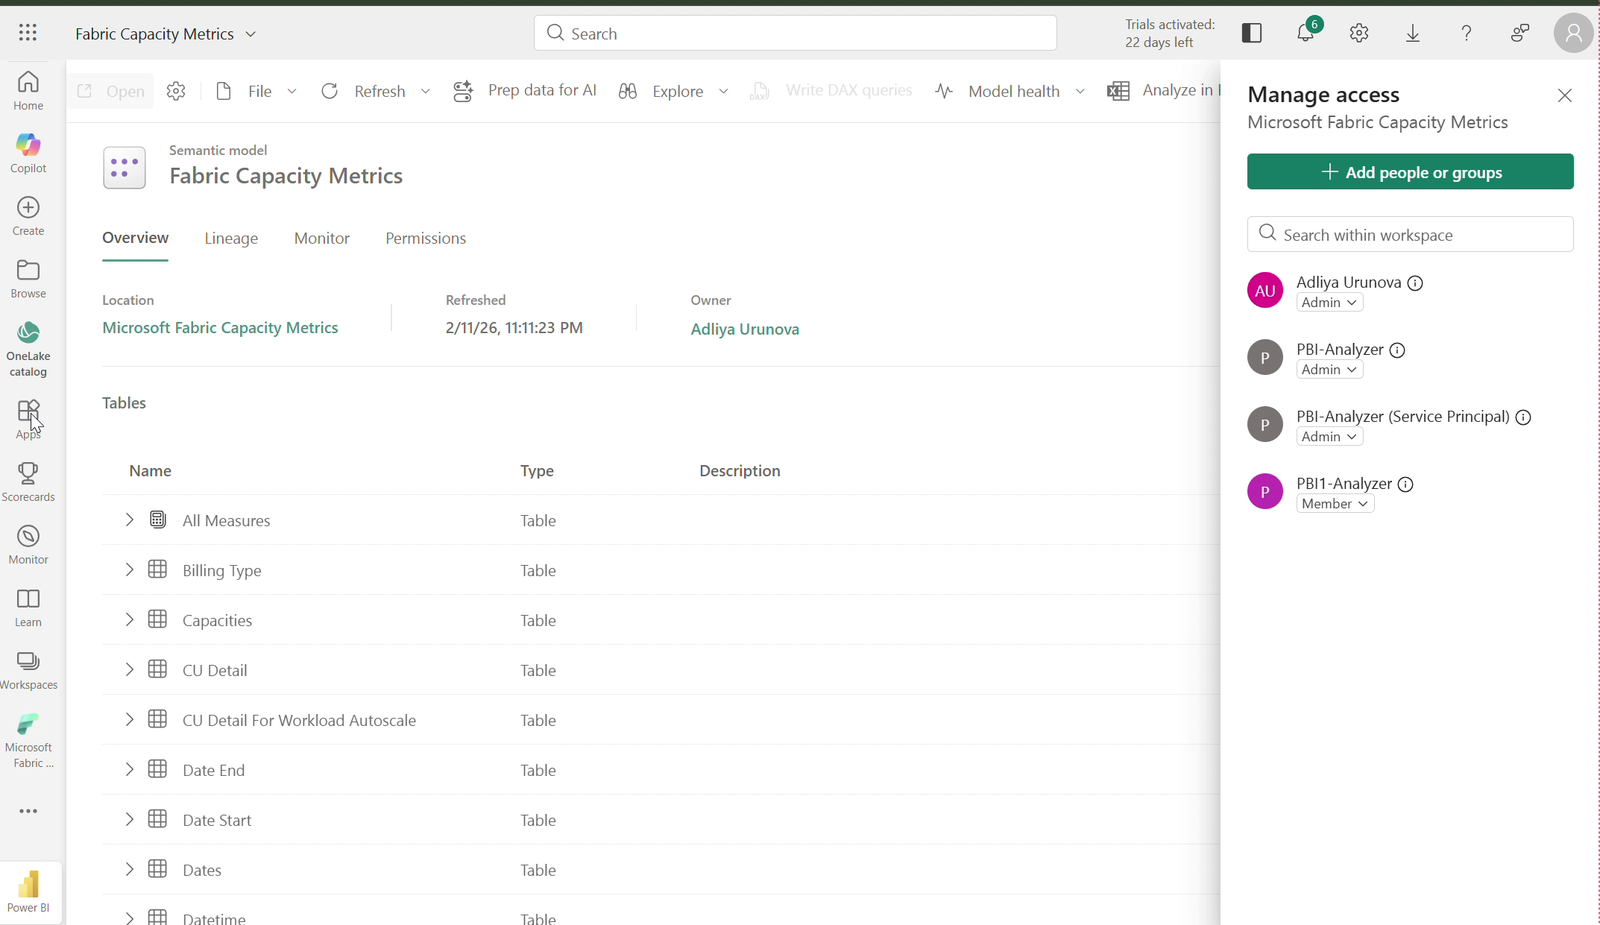
- Search for "PBI-Analyzer" (your service principal name)
- Set the role:
- Member — sufficient for reading data (recommended)
- Admin — full access (also works)
- Click "Add"
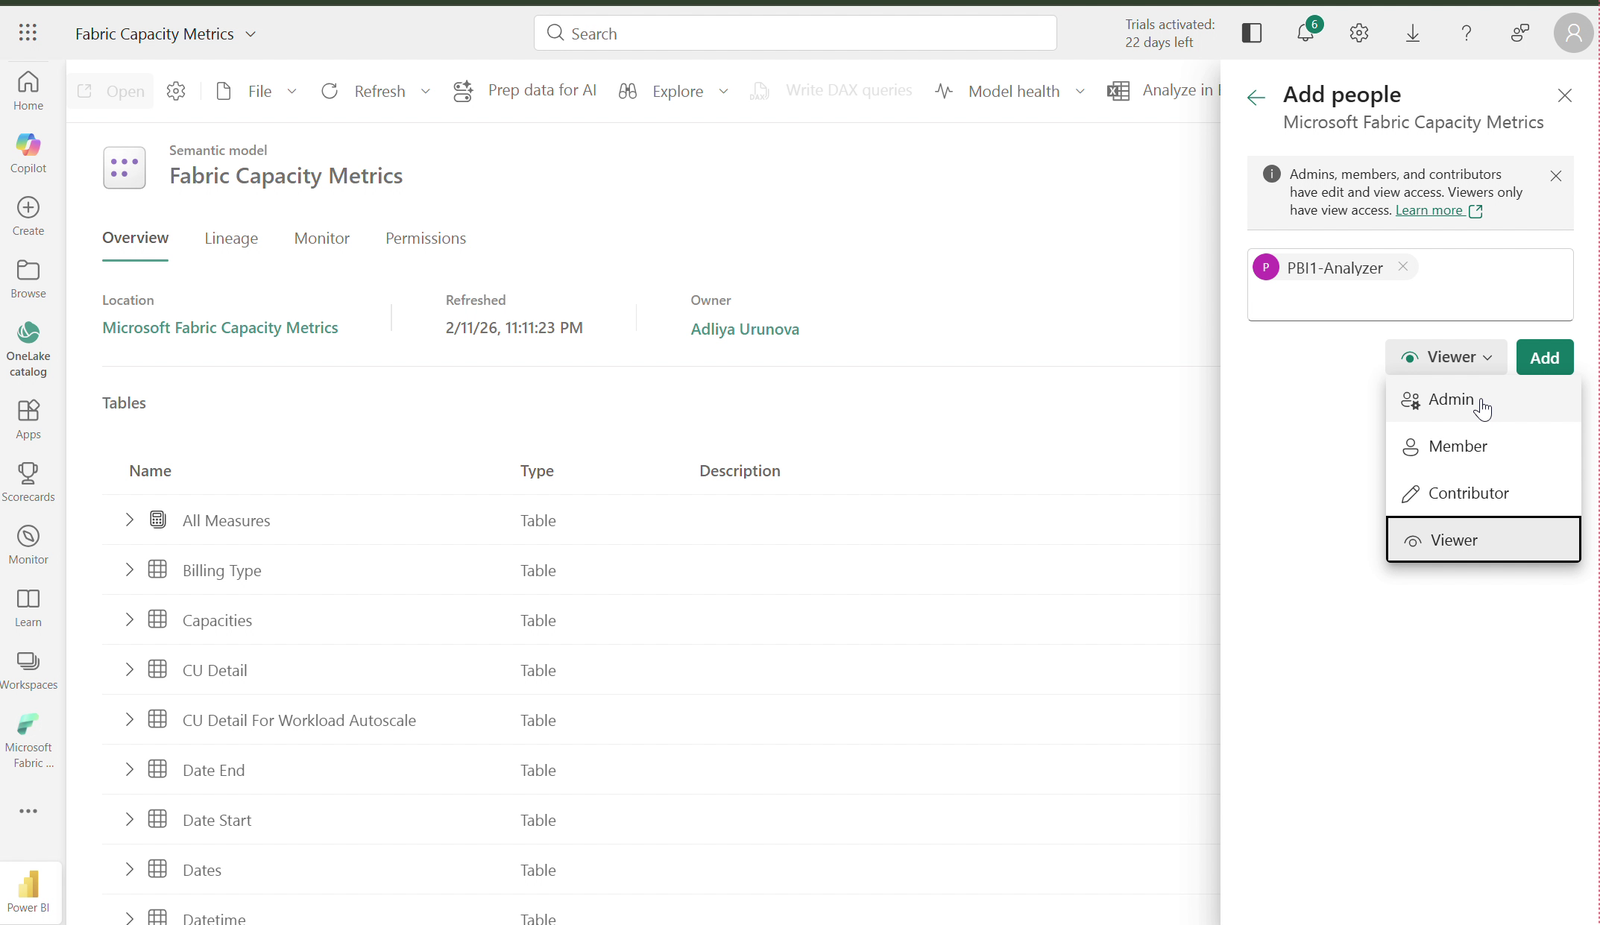
7.4 Important: Add to Fabric Capacity Metrics Workspace
The service principal MUST also be added to the "Microsoft Fabric Capacity Metrics" workspace. Without this, the CU utilization chart will not work because the app runs DAX queries against the capacity metrics dataset.
- Find the "Microsoft Fabric Capacity Metrics" workspace in your workspace list
- Click "..." > "Workspace access"
- Add "PBI-Analyzer" with Member or Admin role
Note: Viewer role is NOT sufficient for the Fabric Capacity Metrics workspace because the service principal needs to execute DAX queries (which requires at least Contributor/Member access).
Step 8: Add Tenant to Soterre PBI Analyzer
Now that your service principal is fully configured, add it to the app. See the step-by-step instructions on the Add a New Tenant page.
What if you don't have admin rights?
Most organizations split these roles, so it's normal that you can't do Steps 1–5 yourself. Three common situations:
1. You know who your admin is
Send them the link to this page with a short note — for example:
Hi! We want to connect Soterre PBI Analyzer (a Power BI QA / monitoring tool) to our tenant. It needs a standard Service Principal setup — an app registration in Azure plus two toggles in the Power BI Admin Portal. Steps 1–5 on this page are the admin part, it takes about 15 minutes: <link to this page>. Could you run through them and send me back the Tenant ID, Client ID and Client Secret?
Once you receive the three values, continue from Step 7 (workspace access) and Step 8 yourself.
2. You don't know who your admin is
- Ask your IT helpdesk "who manages our Microsoft 365 / Azure tenant?"
- Or check inside Power BI: if Settings (gear) → Admin portal is visible to you, you already have the admin role; if not, the person who manages your Microsoft licenses is the right contact.
3. Small team, no dedicated admin
Whoever originally set up your Microsoft 365 / Power BI subscription holds the Global Administrator role. That person can either:
- run Steps 1–5 themselves, or
- grant your account the needed roles in the Microsoft 365 admin center → Users → Active users → your user → Manage roles: add Application Administrator (for Steps 1–4) and Fabric Administrator (for Step 5). After that you can complete the whole guide yourself.
Troubleshooting
| Problem | Possible Cause | Solution |
|---|---|---|
| "Unauthorized" error when scanning | Admin consent not granted | Go to Step 2.3 and grant admin consent again |
| Service principal not found when adding to workspace | Enterprise application not created automatically | Go to Entra ID > Enterprise applications and verify the app exists |
| No workspaces returned by the API | Service principal not added to any workspace | Complete Step 7 — add the service principal to each workspace |
| CU utilization chart is empty | Metrics Workspace ID / Dataset ID not set, or service principal not added to the Metrics workspace | Complete Steps 6.3 and 7.4 |
| Tenant settings not taking effect | Propagation delay | Wait up to 15 minutes after changing tenant settings |
| Client secret expired | Secret exceeded its configured expiration | Create a new client secret (Step 3) and update Soterre PBI Analyzer |